Friday, November 5, 2010

Crushing on Washington and other Randomness...


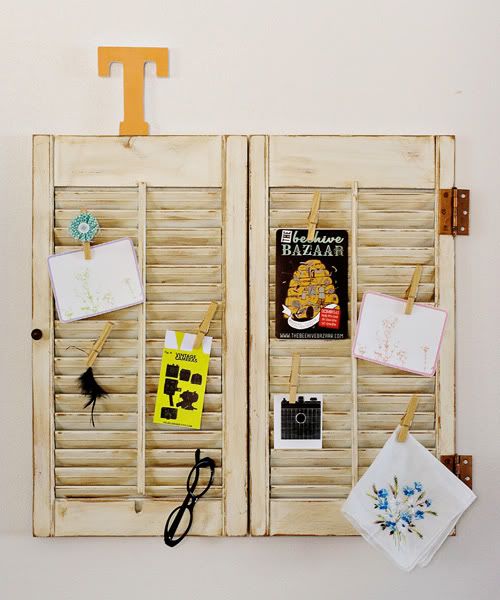
Remember my 79 cent shutters? Hard to forget aren't they! I think I've figured out what to do with them, simple and quick but hopefully cute!

Well look what else I found at the same thrift store...

I so fell in love with the rustic wood and my living room is in need of some major decorations, I thought for sure it would be the perfect size for this picture.


And it is, but wait! Take a step back...

And one more step. Look! I think I may actually like the painting that's in there.

Am I crazy?! Do you agree?

The hubster agrees so I think we may leave it... are we both crazy?!


It reminds me of this picture I took last weekend while skipping church with a sick little one.  I continue to be amazed by the beauty in this area! I feel so blessed to have lived in so many great places. 


And I don't think I'll ever tire of taking pictures of this Mountain or according to rugrat #2 "The dormant volcano."  These were taken straight from the car- I'm totally having a WA state crush!


Next time maybe I should back up or get out of the car so I don't cut out the tree :)


More crushing, if only it would stay this sunny for the whole year :)


And what's even funnier, after editing and playing with these pictures Sunday eve, I'm noticing a color trend, so maybe the painting was meant to be!?


Randomness for sure! If you made it this far have a happy weekend!

Wednesday, November 3, 2010

Shutter Envy

That's what you'll have after I tell you how much I paid for these beauties! My mouth almost hit the floor when she told me the price at the counter... don't know about you, but when thrift stores/garage sales don't have their things marked they are usually expensive or I'm too scared to ask- I know I'm lame and shy. :) This time I'm glad I asked! And I may now be encouraged to ask every time...

79 cents!!!!
that's $1.58 total $1.71 if you guesstimate WA sales tax in there (No clue what I actually pay now, I need to stop moving!)

Seriously.  That's less than $2 for this delicious soon-to-be-something-great-in-my-house.  Shutter envy I know!

And here's where you come in...

I have Shutter Envy with all of these amazing shutter projects...

This one from Tortoise and the Hare...

And because of my terminal rental status, I can only dream of this one found at Olive and Love...


Love what Paisley Wallpaper did with her shutters here.

And what Allison at A Glimpse Inside did with her shutters- love the color contrast!

Or this creative clutter hider at Crafty Nest...

Or this great message board at How Does She?

Now I have some serious shutter envy! I could go on and on, but Target is calling and I must respond!

What to do, what to do...  Thoughts?

Monday, November 1, 2010

Railroad Crossing Sign

Anyone have a little Engineer like I do?  One that can spot a train from a mile away? One that remembers where every potential railroad crossing is in the state? :)

Well then he or she will probably love this addition to their room or playroom as much as my "Mr. Conductor" does!

This sign is so simple it will be hard NOT to make one for your little engineer!


First gather your supplies:

**I will include the dimensions and supplies I used, but one of the reasons I love this project is that it is easily adapted to whatever supplies you have on hand or whatever is easily attainable! I'll include suggestions in parentheses.**
 
2- 2.75"x22" pieces of 1/8"  (you could use 2 pieces of thin plywood from your local craft store found in the wood/dollhouse aisle OR use white foam board)
1- sheet of card stock (you could use vinyl, purchase pre-cut vinyl letters from office aisle, or print and cut letters from word document)
White paint
Modge Podge
Foam Paint Brush
Wood Glue
Staple Gun

1.  Attach your 2 pieces of wood together.

Line them up by eye-balling it or if you want to be exact use and angle.  I glued them together and added 5 staples just to make sure it wasn't going anywhere. 


2.  Paint your board.  Spray paint or acrylic craft paint will do the trick.


3.  Cut out your letters.  
I used my Cricut with black cardstock and the Plantin Schoolbook cartridge set at 3 inches. But remember you could easily use vinyl, purchase pre-cut vinyl letters from office aisle, or print and cut letters from word document.  I would strongly suggest cutting out one letter before doing all to be sure you have the right size. :)


4.  Glue your letters on using Modge Podge.

Do one coat under letters gluing as you go...

And a 2nd coat to seal and coat all the letters...


5.  To hang your sign I used Command Velcro Strips (Love them!)


Enjoy it in all it's glory!


Best part of the project for me?  No money out of pocket! I used all supplies I had on hand... seriously cute and seriously cheap!


edited again! sorry I've posted this same post 4 times now! I should know by now to preview before posting!


Tuesday, October 19, 2010

Nightstands Turned Shelf!

I found this random junk pile in a soon-to-be neighborhood near us while looking for blackberry bushes one day. 

No wonder people put up signs like this!
I really don't get why anyone would just dump their things on someones property, there are so many places to drop off unwanted goods.  Sadly I found this hot spot after it had rained for a couple days, so I missed out on a couple great and fun chairs that were water-logged. :(

But I did find this beauty. 

Ok really I didn't find it like this I found two nightstands looking much like this only way dirtier and with weird flying bugs crawling on it! Seriously the things I will do for a free item- I question my sanity sometimes!

To turn it from 2 of those to this...

Recruit some free labor...

1.  Prepare the furniture- Clean and Sand.
The pieces that I found were nightstands with drawer units.  I couldn't find the drawers in the mass mess, so I had to remove screws and drawer stoppers. 

2.  Assemble your shelf.  Stack the 2 pieces, use wood glue and glue the top to the bottom, then attach the 2 pieces with a flat metal bracket, see a similar one called a Flat joining plate.  (sorry I didn't get a picture of mine!)  I used one bracket with 4 holes placed horizontally between the 2 nightstands.  2 screws going into each nightstand.


3. Glue 4 wood shelves into place.  I used 1/4" plywood found in the scraps section at Home Depot and had them cut down the scraps to the size I needed.  I paid $1.00 total for them and the cuts- big spender I know! :)

Two of my shelves were a little off so I had to use some heavy-duty sand paper and sand them down to be even with the nightstand. (as seen in above photo)

4.  Much to your hubby's dismay paint your beauty spicing up your boring white-walled rental! 

I used a foam roller and a cheapo foam brush and it left a great finish- no priming here. :)

5.  Finish shelf backing.  I took the false bottoms from the original nightstand, cut 2 of them down to size with the jig-saw.  Shh... don't tell the hubby I used it while he wasn't here- he gets a little worried with me and power tools especially since we live in the boonies.  And his worry is probably rightfully deserved- I am the daughter of the same man who lost parts of fingers on 2 separate occasions! 1st to a cement mixer when he was in his 20's and the 2nd time to a table saw while working on the cabinets for our basement bathroom. And I most definitely carry his clumsy genes! Phew that was a tangent! Back on track...

I wasn't too worried about the appearance so I put a light coat of paint on both sides then covered the board with fabric.  I used hot glue to secure it to the back side of the board, wrapping it like a present. 

6.  Attach shelf backing.  I attached the 4 different backing pieces using a heavy duty staple gun. 

7.  Move your shelf on inside and decorate!

This one will end up in my daughters room and will most likely be adorned with a plethora of toys plus a couple extra goodies.  Just need to find some better baskets! :)


Final cost of this project was approximately $7.00!
Nightstands= FREE!
Shelves= $1.00
Quart of Paint= $4.00 (purchased from habitat restore!)
Fabric=~$2.00 (probably less, fabric was clearance at JoAnn's about a year ago!)

This most definitely was a hodge-podge project and tutorial, so please ask if you need more info on any particular step!

AND if you made it all the way to here, I've got another super great labor intensive project that I just finished last night as well! I'll try to get it up soon! :)

UndertheTableandDreaming

UndertheTableandDreaming


Thursday, October 14, 2010

New look!

Have you seen our new look?! It's great I'm in LOVE with it! It's all thanks to the ultra-talented Lindi from Love the Day, who on a side note is even a greater person than her parties- and they're beyond great!  I absolutely love her sunshine party, so happy and bright, I can't help but smile while looking at it!


 I could go on and on about Lindi AND all she does, but I'll save you some time and go take a look for yourself.  You can visit her blog here or etsy shop here. You won't be disappointed!

But before you go grab my fancy new button and enjoy! :)
sweetdaisydesignbutton2

Bags, Bags, Bags

I'm going to have some serious bags under my eyes tomorrow! I think the bound to be foggy morning may call for a hot chocolate and glazed donut from Starbucks on my way to the big blue store of goodness (ie IKEA!!!) AND the best news is, I only have 1 child- the one who's potty trained, which means I'll enjoy an hour of shopping all-by-myself! I'm stoked, hopefully my excitement and a little Starbucks will erase the bags under my eyes from staying up so late for no real good reason!

Here's the rest of the story...

I'm bagged out for a few days, I'll be changing things up a bit and working on one of the many projects I've got going on around here! I've got a big one in the works and it doesn't involve a sewing machine!

Tuesday, October 12, 2010

Notebooks and Bags

It's been a great couple of weeks crafting here...

A composition notebook cover done in possibly still my favorite fabric! I've used it for a toddler skirt, the 'anna' bag, and coffee cozies.  I've got 4 fresh new yards so I'm sure we'll be seeing some more of it!


A smaller version of this bag, in this delicious yellow fabric which is on it's way out.  It was part of a large stash I snagged from the hubsters grandma's stash, there's not much left but one thing is for sure- I'll make good use of it! :)


But first things first, things can not go on like this anymore!
Something has seriously got to be done about this mess! Like I said it's been a great couple weeks of crafting around this joint!  Time to finally finish putting together my crafting area... wish me luck!